Black Widow Has More Fight Scenes Than Any Marvel Movie

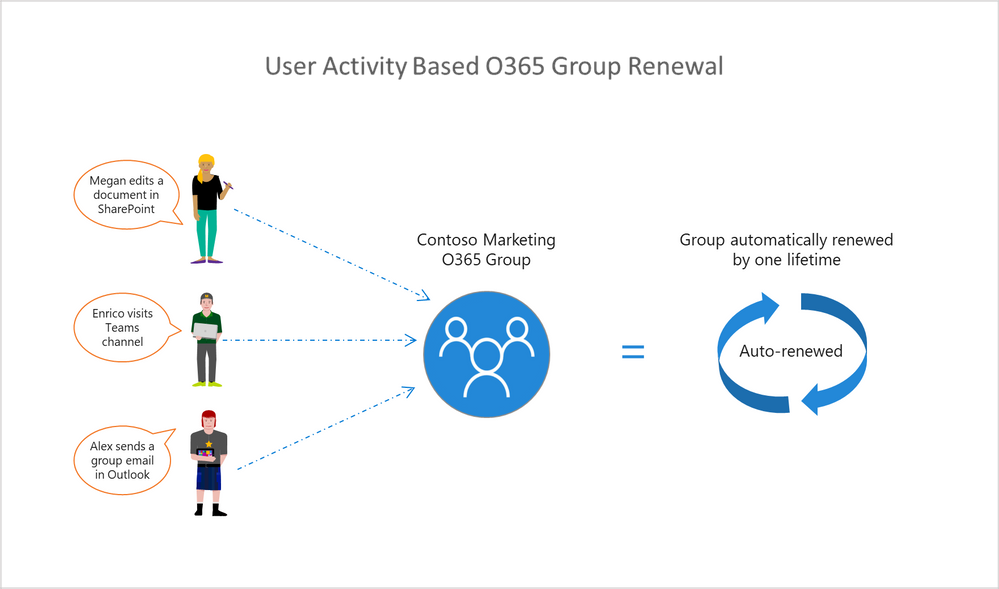
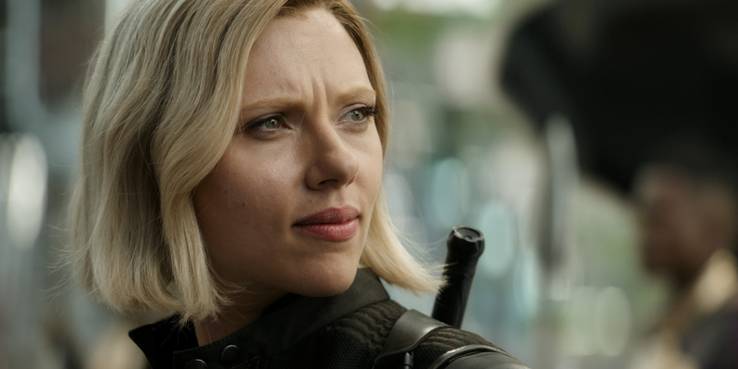
Marvelactress Scarlett Johansson reveals that her Black Widow solo movie has more fight scenes than any other movie in the Marvel Cinematic Universe. Natasha Romanoff, (a.k.a. Black Widow), has been in several movies in the MCU ever since her introduction in Iron Man 2. After 10 years of being a main character in the Marvel movies, she is finally getting her own solo film.

Ever since she took down Happy Hogan in Tony Stark’s boxing ring, Black Widow has been seen as a formidable fighter in the MCU. Iron Man 2 introduced Black Widow’s iconic scissor kick move, but she has had some other incredible fight sequences in the past 10 years. Avengers: Age of Ultron revealed that Natasha was trained in a Soviet facility known as the Red Room, and the program created some of the world’s most elite assassins by brainwashing, vigorous training, and sterilization so they would never be distracted by a family. Black Widow has fought her way through many battles, such as the Chitauri Invasion, the HYDRA Uprising, and the battle against Thanos, but the Black Widow solo movie might top them all.Continue Scrolling To Keep ReadingClick the button below to start this article in quick view.START NOWADVERTISING

RELATED:Black Widow Movie SDCC Footage Description 

In our exclusive interview with Johansson, the actress revealed that Black Widow will have more fight sequences than any other Marvel flick. When asked about her rigorous training process, Johansson responded by saying:

“Oh, yeah. There’s a lot of fighting in this movie. Like, so much fighting. Much more fighting than I think has ever… I think other producers that come onto the set, they’re like, ‘There’s more fighting in this than any other Marvel movie we’ve ever made.’ It’s just brutal. I think because it’s based in reality, all the action is based in reality and it’s a lot of hand-to-hand combat. It’s painful.”

During the Con, Marvel announced several of their upcoming films, as well as all of the shows that would be airing exclusively on the Disney+ streaming platform. While fans were excited to hear about the sequels for Doctor Strange and Thor, fans were also excited for original movies like Eternals and Shang-Chi and the Legend of the Ten RingsWhile these films (and more) were revealed at SDCC, Black Widow got the most attention from Marvel since the film will be the first movie of Phase 4 to be released.

While the fight scenes will probably not be as big as the battle sequences in films like Avengers: Infinity War or Avengers: Endgame, it is completely possible that Black Widow could have the most fight scenes total. After all, Taskmaster is a character known for learning combat techniques from other superheroes and then using their own moves against them. Marvel also cast David Harbour as Red Guardian, who is basically a Russian Captain America and a master of hand-to-hand combat. The film has the benefit of not having to introduce fans to Johansson’s character, so that more than likely allowed them to add in more action sequences. If Black Widow’s fight scenes are as well choreographed as the ones in films like Captain America: Civil War or Avengers: Endgame, then fans should be in for a treat.

I am JEFF ROOT working as an IT professional and holds a very good experience in the same field. You can check my work at www.norton.com/setup & www.mcafee.com/activate

Microsoft Adds Office 365 Group Lifetime Auto-Renewal Feature

Microsoft says that a new user activity-based expiration policy can be enabled for Office 365 groups by select Azure AD Premium customers starting today allowing for automated lifetime renewals without any user intervention.

Office 365 is part of the Microsoft 365 software bundle which also comes with Windows 10 and EMS (short for Enterprise Mobility + Security), a bundle which in Microsoft’s vision provides customers with the easiest way of enjoying an easy to manage and secure online productivity platform.

Office 365 groups are the main collaboration method for Microsoft 365 customers, making it possible for users to communicate with their teammates while using various Microsoft apps such as Outlook, Teams, Yammer, and SharePoint.

New O365 group expiration policy in private preview

Select Azure AD Premium customers will be able to enable the new Office 365 groups expiration policy starting today, allowing active groups to avoid being deleted automatically after the group lifetime is reached, as Office 365 Groups Program Manager Salil Kakkar explains:

We are excited to announce the new version of expiration policy which ensures any group being actively used continues to [live on]. This feature makes life easier for users, including admins, group owners and members, by automating the expiration and renewal process by tracking groups for user activity across different apps, like Teams, SharePoint, Outlook, tied to the group.

The new activity-based Office 365 groups expiration policy will allow organizations to improve their groups’ lifecycle management by keeping a balance between making sure that useful groups where employees are actively sharing are not haphazardly removed and deleting the ones no one uses anymore.

While the current group expiration policy will alert admins to remove or renew Office 365 groups for which the expiration timeframe has been reached, after enabling the new policy “groups which are being actively used will be automagically renewed.”

The activity-based group auto-renewal behavior is based on user activity from Outlook, SharePoint, Teams, Yammer, and other Office 365 groups.

Office 365 group renewal

Renewed group list in Azure portal

As explained by Microsoft in the feature’s Office 365 blog post announcement, the automatic group renewal will be triggered by the following user actions for the following apps:

• SharePoint – View, Edit, Download, Move, Share, Upload Files
• Outlook – Join group, Read/write group message, Like a message (OWA)
• Teams – Visit a Team’s channels

Once the feature will be enabled in the Microsoft Azure portal, admins will be able to get a quick overview of all automatically renewed O365 groups for their organization.

List of deleted O365 groups

For enrolled Azure AD Premium customers to toggle on the activity-based auto-renewal for groups no action is needed since “if an expiration policy is set for Office 365 groups, auto-renewal will be enabled by default.”

Office 365 group owners can also restore their groups’ contents after unintentional deletion for several apps including but not limited to SharePoint, Planner, and Outlook for a period of 30 days using the procedure detailed on the “Restore a deleted Office 365 group in Azure Active Directory” page.

SOURCE

I am JEFF ROOT working as an IT professional and holds a very good experience in the same field. You can check my work at www.office.com/setup & www.norton.com/setup

Move Forward with Norton to keep yourself away from identity theft

With the integration of the Internet and technology, the contemporary culture is connected now more than ever. While this internal connectivity may make few things accessible and less beneficial, such as identity theft, which is now seems to become easier. Understanding what exactly identity theft happens, you would be able to take measures better.

As per reports published by cybersecurity firms, it has been noted that the fluctuation in identity thieving activities was much changed for the past few years and seems more as being constant. However, many antivirus claimed to deliver respective security features, the conclusion for the best security provide came out to be Norton antivirus.  

Getting along with Norton security, the firm suggests few measures that every user should take who have the access to the internet. Users not paying attention to their personal data or devices could lose their personal data as crooks perform several actions, some of them are mentioned below.

  • How thieves get into your personal and financial account

Some of the most frequently occurring actions are dumpster diving, robbery, phishing, phone scams, data dumps. If you do not have a trusted antivirus security, you cybercrooks will be able to breach into your data.  

  • Online presence can harm you

Unless you do not have an active antivirus software such as Norton.com/setup, you will be reachable to the hackers. As you share you IP address while being online, you can not only lose your online data, but cybercriminals can intrude into the data stored on your PC.  

  • Assist your kids and elders for security measures

Possibly, not everyone is aware with the fact how significant role does an antivirus play. Therefore, take the responsibility to educate yourself and other about the need to having a Norton setup on your devices. Help you family in staying protected against cyber bullying and crimes.

If you are concerned of losing your bank account, social media profiles, and other personal belongings, it is suggested to have Norton setup on all your active device with or without internet connectivity. Also, if you are an existing user, make sure to keep the software activated. If facing errors using the software, go for Norton support for professional assistance.

I am JEFF ROOT working as an IT professional and holds a very good experience in the same field. You can check my work

www.norton.com/setup | McAfee.com/activate

How to fix “Your Computer is at risk” issue using the McAfee Virtual Technician?

McAfee is one of the top brands that have been launching a number of antivirus software to offer a better protection to its users against the various threat attacks that may harm the personal data of the users. Sometimes the users may face commonissues while running the McAfee software to detect all the threats prevailing on the device and one of such issue is “Your Computer is at risk”. A message box displaying the following messages will appear on the screen as soon as the McAfee antivirus software will detect any problem on that device:

  1. At risk – Verify Update
  2. At risk – Turn on Real-Time Scanning
  3. At risk – Turn on Firewall
  4. At risk

These messages displayed on the screen, depends on the cause of the issue. For an instance: in the error message “At risk – Verify Update”, the “Verify update” is the cause of the error.

Solution:

Before initiating the process of resolving the issue, ensure that the McAfee software has been updated. The product will automatically get updated, if the updates of the McAfee product are available. Now, wait until the McAfee.com/activate software gets updated.

Once the software gets updated, restart the device and again run the complete scan process. If the “At risk” error still persists on the device, then follow the methods mentioned below to get rid of that issue:

Methods 1: Run McAfee Virtual Technician (MVT):

(Important Note: The McAfee Virtual Technician is a software tool that automatically runs to scan all the issues prevailing on the McAfee product installed on the device.)

  1. Firstly, the users need to download the MVT tool. To do so, visit the official website of McAfee antivirus.
  2. Here, click the “Troubleshoot and Repair” page.
  3. On this page, click the “Download and Run” button.
  4. Now, save the “mvt.exe” file on the desktop or at any location.
  5. After downloading the .exe file, either double-click the file or tap the “Yes” button to run the MVT.
  6. Wait till the MVT tool gets installed on the device.
  7. After the tool gets installed on to the device, the MVT will get started and automatically scan the device for all the issues related to the McAfee products.
  8. If any of the issues are found on the device, then click the “Autofix” button on the tool else, close the tool.
  9. Now, follow the on-screen prompts to fix the issue.
  10. At last, again scan the device and if the status still shows that “Your Computer is at risk” then follow the Method 2.

Method 2: Reinstall the Software:

  1. Uninstall the McAfee product that has been installed on the device using the standard removal method.
  2. For uninstalling, go to the Control Panel >> Uninstall a program.
  3. Search the McAfee program and then click the “Uninstall” option.

Steps of re-installing the McAfee product are:

  1. Visit the Official website of McAfee.
  2. Now, sign in to the McAfee account.
  3. And then, click the “My Account” option.
  4. In this window, search and select the PC you are currently using.
  5. After this, select the McAfee product subscribed by the users.
  6. Now, click the “Download” button.
  7. Mark the “I Agree” checkbox after reading the End User License Agreement, in order to make an agreement to it.
  8. Follow the instruction set displayed on the screen to install the McAfee product on the device.

Now, run the McAfee product on the device for scanning the issues of it. And if still the status is “Your Computer is at risk”, then contact the McAfee Customer Support on the McAfee toll-free number to get an instant assistance for resolving the issue.

I am JEFF ROOT working as an IT professional and holds a very good experience in the same field. You can check my work >> mcafee.com/activate

How do you download and install McAfee antivirus?

For your PC’S and Mac, it is very easy to download and install the McAfee software to secure the data. You can install the McAfee software via online and offline both. Before you download, you have to purchase your security software, which you can purchase from online, by visiting the link McAfee.com/activate to activate else, you can purchase it from a nearby retail shop.


Steps to download McAfee activate via Online:-

  • Visit the website mcafee.com/activate.
  • If you are an existing user, log in to your McAfee account.
  • If you are a new user, you have to create a new account.
  • If you are creating a new account, you have to enter your name and other details asked.
  • Select the payment method and make the payment to purchase the product.
  • Now, go to “My Account” and then download your purchased McAfee product
  • Read the license agreement carefully and then click on “agree” to complete the downloading process.
  • Wait until the download process is finished
  • Proceed further for the installation process.
  • The installation step can take some time, which completely depends upon the working speed of your computer, so be patient.
    Steps to install McAfee activate via Online:-
  • Click on the “Download” folder.
    Note: Any downloaded software, files or folders will be displayed in the “Download” folder(by default), until unless you make the changes.
  • double click on “Mcafee Antivirus” file to access the software.
  • You can now click on the setup or run the McAfee software depending upon the browser you use.
  • McAfee activate process is now started to install.
  • Mcafee.com/activate will now ask for the McAfee Activation product key.
  • Click on “Next” and follow instructions given on-screen
  • After you complete all the on-screen instructions, the installation process will be finished.
  • The installation step can take some time, which completely depends upon the working speed of your computer, so be patient.

Some common errors you might face while downloading or installing Mcafee activate:-

  • Error 12152:- File missing, this error usually happens when McAfee download servers are not 100% in sync.
  • Error 7305:- file mismatch, this error occurs when the properties of the downloaded file do not match with the expected properties.
  • Error 76556:- Communication error,
  • Error 122002:- Connection timeout, it usually occurs due to the bad connection or low connectivity to the internet.
  • Error 12030:- Connection aborted. This error occurs due to the lost connection.

I am JEFF ROOT working as an IT professional and holds a very good experience in the same field. You can check my work >> mcafee.com/activate

How to Transfer Norton Antivirus to Another Device ?

Norton antivirus is one of the widely used security software across the globe. It is highly acclaimed for offering endpoint protection against all kinds of viruses lurking in the internet world. These viruses directly attack to your computer system with an intention of stealing your confidential information that you enter while accessing your bank account online. These viruses also have the ability to corrupt your data. And there are some viruses like Ransomware that can make you lose your data permanently, if you don’t pay them huge number of bitcoins as a ransom. To deal with all these viruses and phishing scams, Norton has come up with a great range of security solutions for Windows and Mac OS.

That is why installing a Norton antivirus on your PC has become this much important. If you are already protecting your laptop, desktop, tablet or Mac with Norton security and want to transfer the same security to some other device, then please note that you can do this without any hassle. This feature is a boon for those switching from their old device. With this, you don’t need to purchase new security software for your new device. To do so, you need to follow some simple steps that have been mentioned below:

  • Visit Norton website to download the same product again
  • Re-install it on the new device
  • Go to the main screen in Norton antivirus
  • Click Activate Now
  • Hit the Next button
  • In My service PIN field, provide the pin number, provided to you by your service provider
  • In case, you have purchased the antivirus online, check your email ID for the pin
  • Click Activate and you will see two options:
  • Purchase a new license
  • Transfer a license
  • Under the second option, find the computer from which you want to transfer the license
  • Click Deactivate

I am JEFF ROOT working as an IT professional and holds a very good experience in the same field. You can check my work >> mcafee.com/activate

How to fix McAfee Safe Connect can’t create a VPN connection?

McAfee is an outstanding security software program that not only protects you from malware, spam, phishing, virus, and other online threats. It is very essential to install it on your PC as well as on your smartphones to keep it working flawlessly without any threats. Among the other products of McAfee, McAfee Safe Connect is one of them.

Through McAfee Safe Connect you get to access a secure connection and it uses VPN or Virtual Private Network which helps in doing so.  Protects you from online spying and secure your online transaction and data safe.

Although it works superbly still sometimes, the user may face some common issues like McAfee Safe Connect fails to create a VPN connection, thus the user is unable to browse websites through it. Make sure you check the given possibilities if McAfee.com/Activate Safe Connect can’t create a VPN connection-

  • Full access to Internet Connection.
  • Latest version of McAfee Safe Connect installed.
  • Maybe the device isn’t rooted (Android) or jailbroken (iOS)
  • No interference from a firewall app or other VPN app.

If the user still faces the issues and they are using PC, then they need to look on their PC as well as check the LAN settings. Check out the steps as listed below-

  1. You need to open McAfee Safe Connect
  2. Turn off the McAfee Safe Connect protection.
  3. Select the ‘Start’ button from the Windows taskbar.
  4. Look for the search box and enter ‘Control Panel’
  5. Click on it.
  6.  Select the option ‘Network and Internet’
  7. You need to open ‘Internet Options’
  8. Click on the option ‘LAN settings’ on the ‘Connections’ tab.
  9. Go for selecting ‘Automatically detect settings’.
  10. Click on the option ‘Ok’
  11. Open again the McAfee Safe Connect and put it in turn on mode.

Please note- LAN settings get reset, automatically- when you connect or change the virtual locations.

If the user still faces the issues and is Android users then they need to connect to another network type and follow the exact steps as listed below-

  • The user needs to connect their Android device with a different type of network. For example- If they are connected with the mobile data then change it to Wi-Fi.
  • Check it once, whether the McAfee Safe Connect can create the VPN connection. If not, then follow the next steps, carefully.

Follow the steps as listed to check on the Android settings-

  1. Select the option ‘Settings’ followed by ‘Wi-Fi’ ‘Advanced’ in ‘Device Settings’ tab.
  2. Turn off ‘Avoid poor connection’.
  3. In the ‘Device Settings’ tab, click on the option ‘Settings’ followed by ‘Manage Apps’ ‘McAfee Safe Connect’ app info.
  4. Select the option ‘Clear Data’.
  5. Turn on and off in your Android device.
  6. Select the option ‘Settings’ ‘Wi-Fi’ in the ‘Device settings’
  7. You need to turn off ‘Smart Network’ (If the device has this option)
  8. Open McAfee Safe Connect app.
  9. If the user is a premier subscriber then they need to sign-in or sign-up, according to their condition.

If the user is an iOS user and is facing issues then they need to turn on and off in Airplane mode. Check out the steps as listed below-

  1. You need to turn on McAfee Safe Connect app.
  2. Select the option ‘Settings’.
  3. Click on the option ‘Airplane mode’ to turn it on.
  4. Select again the ‘Airplane mode’ to turn it off.
  5. Check whether McAfee Safe Connect can create the VPN connection or not.

If you still facing the issues then go for reinstalling the McAfee Safe Connect profile-

  1. You need to open McAfee Safe Connect.
  2. Select the ‘Reinstall profile’ from the list.
  3. Click on the option ‘Protection’ on the main screen.
  4. Follow the onscreen instructions
  5. Check to see if McAfee Safe Connect can create the VPN connection. 

I am JEFF ROOT working as an IT professional and holds a very good experience in the same field. You can check my work >> mcafee.com/activate

How to Log In to the McAfee Identity Theft Protection Account?

Nowadays, users need to keep their identity safe and secure from being misused by malicious users. So, to offer ease to the users, McAfee has included the feature of Identity Theft Protection to its entire products like McAfee MTP, McAfee Antivirus, and many more. For enabling the McAfee Identity Theft Protection, the users need to enroll to their McAfee Identity Theft Protection Account. So, the stepwise procedure to log in to the McAfee Identity Theft Protection Account has been detailed in the below information.

By enabling the feature of Identity Theft Protection, the users could easily shield their personal and financial details, and credit or public records from being misused by the users. Before initializing the process of login to the identity theft protection of the McAfee product, there are some points that the users need to keep in their mind. Some of them are as follows:

  1. Always access the McAfee Identity Theft Protection Account using the supported web browser.
  2. Some of the supported web browsers are as follows:
    1. Microsoft Internet Explorer 11, 10
    2. Mozilla Firefox 56, 55
    3. Google Chrome 63, 62
    4. Apple Safari 11 (Mac and iOS)
  1. Log in through the McAfee Account:
    1. First of all. Access the official website of McAfee Activate product.
    2. And then, click the “My Account” option from the McAfee home page.
    3. After this, click the “Sign In” option from the drop-down context menu.
    4. On the “Sign In” page, enter the email address and password of the McAfee.com/Activate Account.
    5. And then, click the “sign in” button.
    6. Now, navigate the McAfee My Account page for the “Access your Identity Theft Protection” panel.
    7. On this panel, click the “Sign In” button.
    8. And then, enter the details like McAfee Identity Theft Protection User ID and Password within the space provided to the users.
    9. At last, tap the “Sign In” button.
  2. Log in through the McAfee Activate Product:
    1. First and foremost, open the McAfee Activate Product on the device.
    2. And then, go to the “McAfee Identity Theft Protection” from the main window.
    3. After this, tap the “Sign In” button.
    4. Now, on this sign in page, enter the required details like User ID and Password of the McAfee Identity Theft Protection.
    5. At last, click the “Sign In” button.

I am JEFF ROOT working as an IT professional and holds a very good experience in the same field. You can check my work >> mcafee.com/activate

How to Fix Error Code ‘0xc004f074’ in Windows 8, Windows 10?

Microsoft, the tech giant keeps on launching new versions of its Windows operating system in order to make the latest technology, features and more accessible to its users. You can easily upgrade from one Windows version to the other. After you upgrade your system to Windows 8 to Windows 10, it needs to be activated to start using it.

While installing the new Windows version, you may find an error, which will further stop you moving towards activation. The most common error code most of the users encounter is 0xc004f074’. To fix this error, try one of our solutions that have been mentioned below:

  1. Solution
  2. Open the menu on by clicking over the start button in the taskbar
  3. Search for “Command Prompt” and right click on it
  4. Click on “run as administrator” from the options
  5. If any dialogue box prompts, click Yes
  6. Enter the command – “slmgr.vbs –ipk XXXXX-XXXXX-XXXXX-XXXXX-XXXXX
  7. Replace the letter X in the command with the product key
  8. Press Enter
  9. Now, type a  second command- “slmgr.vbs –ato” and hit Enter
  10. Reboot the Windows 8 or Windows 10 device and see if your device gives you the same error.
  • Solution
  • On the start screen, press Windows key + R together
  • Type “Slui 3” in the run box and hit Enter
  • Enter your product key in the next window
  • Click the Activate button
  • Restart your device and check whether you are facing the issue again or not
  • Solution
  • Like the Solution 1, open the Command Prompt as “run as administrator”
  • Enter the command- “sfc /scannow” in the run box
  • Let the sfc scan run and once it’s done, restart the Windows 8 or Windows 10 device
  • Check if it worked or not

After trying all the aforementioned solutions, if the problem still persists, then contact Microsoft customer support team to get the error fixed by a certified technician. The technician team at McAfee.com/activate for 24*7, so you can call them anytime.

How to fix the issue while downloading McAfee programs- Error 12152 or 7305?

McAfee is considered to be the world’s largest and most reliable security technology company. Although it works very smoothly without any bad reviews from the user. But sometimes the user may face some difficulty while going to download and install McAfee Security products.

While going to download the security products, one might face issues. The message may display on the screen. They are:

  • An error 7305 displays on the screen.
  • Unable to continue the installation- an error12152, can pop-up, with failing of the installation process
  • Something went wrong with the installation.

The issues face by the user while downloading their products, either the download gets failed or the download gets disconnected because of the errors like 12152 or 7305. This normally happens when the user wait for the download to settle down and it takes more than 15 minutes.

There is always a solution to every problem. Below provided are the steps, to follow to solve such issues when faced. They are as follows :

  • Step 1- If the downloading and installing is still incomplete, while waiting for so long. Then one can do
  • Take help from Virtual Assistant.

Tips- The Virtual Assistant will open in a new tab or window. Follow the instructions as provided and close the window or tab, after you are done.

  • Take help of the Manual steps, as provided below.
  • Step 2– One can download and run the Pre-install tool and the McAfee Consumer Product Removal Tool. Below are the steps to follow for downloading and running the Pre-install tool. They are as follows-
  • The user needs to download the Pre-Install Tool.

Tips-the file needs to saved in a temporary location, such as Desktop.

  • Now after the downloading is over, one needs to double-click the Pre-Install_Tool.exe and follow the further instructions.
  • The pop-up window will display on your screen, asking for you to go with the changes or not. Click on the Ok button to proceed.
  • After the Pre-install Tool installation gets over. Simply go with the following instructions as they were asked. Click Ok button. Then Click on the Close button and then Restart the computer.

After the computer gets restart, wait for sometime around, not more than 30 minutes. Then again try to download and install McAfee Product. Still, facing the problem? Then follow the instructions and the steps as provided for McAfee Consumer Product Removal Tool.

Before one gets started with the downloading, they need to follow certain tips- they need to bookmark or put it on the favorite list so that they can come back to this article later. And they need to save all the open files and close all the programs if it’s running.

Now they need to follow certain steps for successful downloading. They are as follows-

  • The user needs to download the MCPR tool.
  • After the downloading gets over, one needs to double click on MCPR.exe.
  • After the clicking, if one face any security warning. Depending on the version of the Windows one uses, simply click on the button Yes, Continue and Run button.
  • Now, McAfee Software Removal Screen will appear on the screen, after it gets installed and run properly. Read the instructions and click on the Next button. The End User License Agreement (EULA) page will open, read them and after that click on the Agree button to proceed next.
  • After Agreeing with EULA page, the Security Validation Screen will appear on the Computer screen. One needs to type the characters as displayed on the screen and click the Next button to proceed further. This step helps in avoiding the accidental use of MCPR.
  • When whole procedure gets over, one may encounter with any of the following messages– Removal Complete or Cleanup Unsuccessful. Click on any of them, as one sees.

Please note- Make sure to download the new copy of MCPR, for every use. This will help in the latest version and the new McAfee products will be recognized.MCPR isn’t meant to clean-up 100% of components. It will only omit the components needed for re-installation. Completion of the steps will require Restart.
If you still facing the same issues, for downloading and installing the McAfee products. Then you can reach out to Mcafee.com/Activate team to help you up.